I always had a sweet spot in my heart for baking and trying out a different career stopped me from following what I enjoy doing. When my kids were small I enjoyed making there birthdays with many creative ideas. Just the thought that I made the cake, sweets and birthday treats was so special to me. As a mom I would ask my kids what there next birthday theme would be, of course they would mention a new cartoon movie or tv show.
Once a theme was picked by them I quickly realized that theme wasnt available, why? it was simply too new. It was fun to hear what would be there next birthday theme because they have a new favorite character but the hard part was finding the birthday theme or any item related to the movie/tv show of there choice.
In most cases no party items was available so that is when I would get creative. I would start getting the colors needed and work my way up there, in other words we would make it happen. Thinking back adding such a simple item like your own DIY sprinkles (customized to birthday/party theme) wouldve made it even brighter.

Today I want to share how something so simple like making sprinkles can really bring any party come together. How? you can use these DIY or you can buy the colors you need to add that pop of color that flows with your party theme on baking items such as cookies, cake, cupcakes, cake pops, donuts, you name it.
Sprinkles has elevated desserts to another level, many years ago it was just a colorful topping on ice cream but today the dimension, colors and texture can make a pretty cute look so glam. If my dessert teacher would hear that last sentence she would flip jejej.. why? she would share in class that no cake should be decorated with sprinkles.
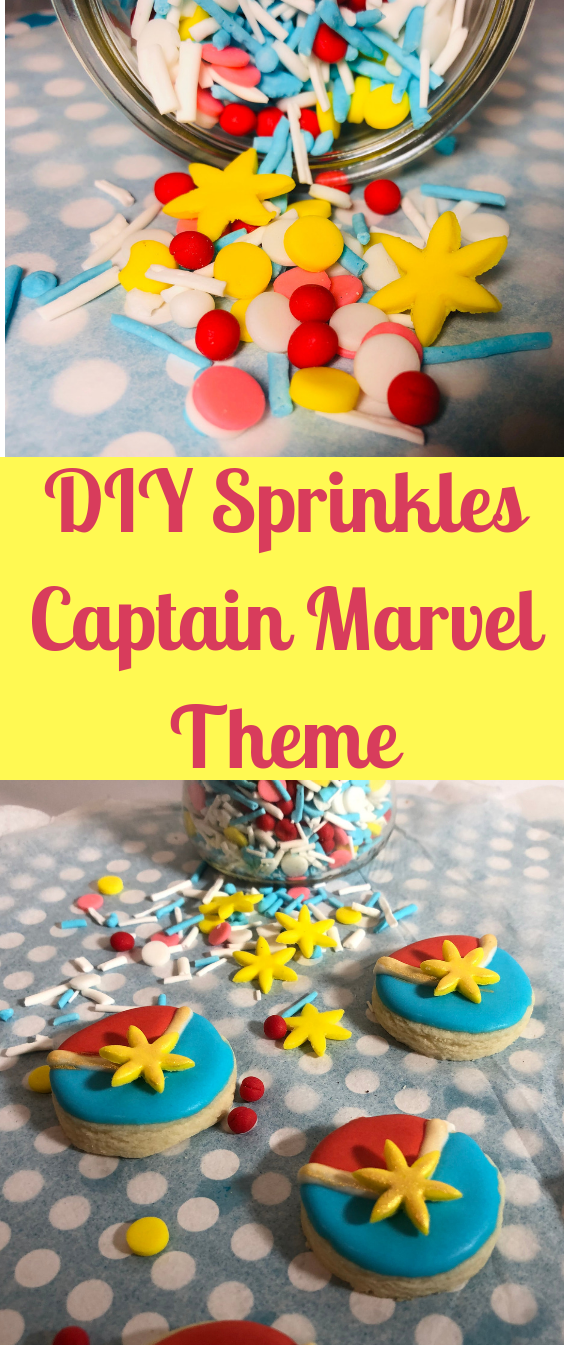
Today I seen many stunning cakes with a nice touch of sprinkles but before we continue I want to say that the more texture, colors and designs the sprinkle has the cuter it will be.
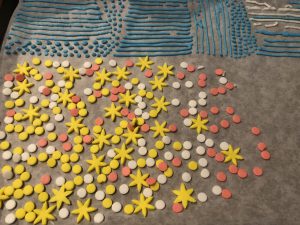
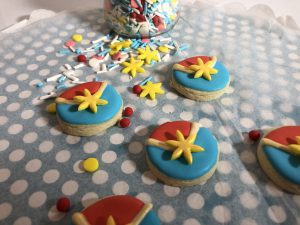
Well lets get started on how to make these DIY sprinkles, for my theme I was going for Captain Marvel with a touch of pink to make it a bit girly. The logo or design of Captain Marvel is dark tones of Red and Blue with a Gold star in the center, adding pink and changing the blue to a lot lighter surely came out modern and girly.
So what I did was start with fondant designs, these can take about a day to dry. I color 4 small pieces of fondant you wont need a lot depending how many containers you want to fill.
Fondant colors You will need
- Red piece – for small balls
- White piece – for small circle
- Pink piece – for small circle
- Yellow piece – for small circle and Star
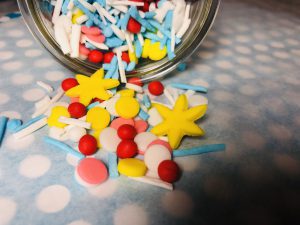
Since the center looks like a star, I used a small cutter I have that is perfect for that design. For the circles I used a large tip #12 as my cutter and for the small balls I used the same tip and rolled them my fingers until getting the ball look.
(sorry for the dark pictures)
Instructions:
- First, color your fondant until you reach the colors you desire (I use Wilton for light colors and Americolor Super Red to get bright red)


- Roll your White fondant and start to cut the fun shapes, I use tip #12 for the circle shape. Continue this step for Yellow, Pink and Red fondant
- With the Red circle fondant made, roll them in the palm of your hand to make little balls, continue will all of the Red circles
- Roll Yellow fondant with the star cutter cut as many shapes as possible – this cutter is a 3 piece set that is used to make a Daisy flower shape
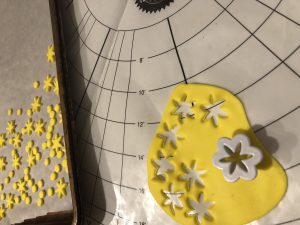
Set aside on a parchment paper and let dry for 8 – 24 hours
For the white and blue colors we need to make some royal icing to get those cute lines. this is so easy to do and a little bit goes a long way. All you need to do is make some royal icing and pipe lines on parchment paper. You can use my recipe royal icing recipe
Is so easy to make the sprinkles.
- First prepare royal icing inside a piping bag with a tip #1- #3 (any of these tips will work great)
- in a parchment paper make lines they dont have to be perfect since they will be cut once it dries
- have fun, pipe as many lines as it fit and pipe the colors you prefer
- let the lines dry for about 8 hours or over night.
- you can roll the parchment paper press slightly to cut each line then you can pour the sprinkles into a container
This was so much fun to make and I love you can make your theme come to live with the colors and cute designs.